Blogging and Sweet Treats.

Hi Everyone!

Throughout this semester I have highly enjoyed the chance to develop my blogging and social media skills. Blogging is certainly something that is completely new to me and this class gave me the chance to develop something that I love, baking, and share my development with the readers of my blog. LottieCakes has shown me that people do enjoy following someone’s development within a specific field. Originally I felt that people would not be interested in following an amateur bakers path to developing the skill, but I was absolutely proven wrong.

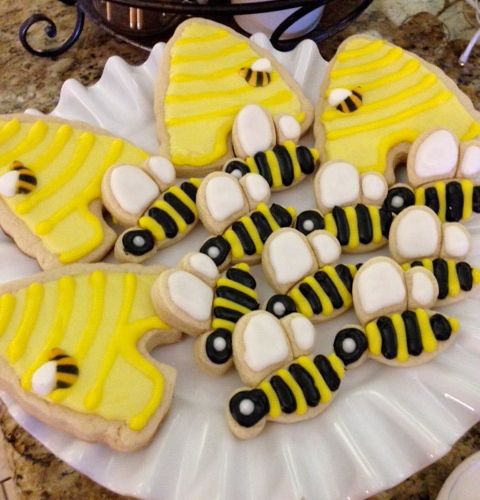
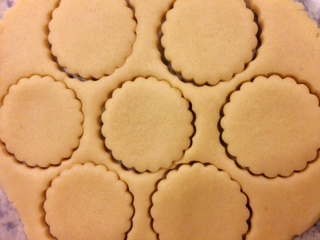
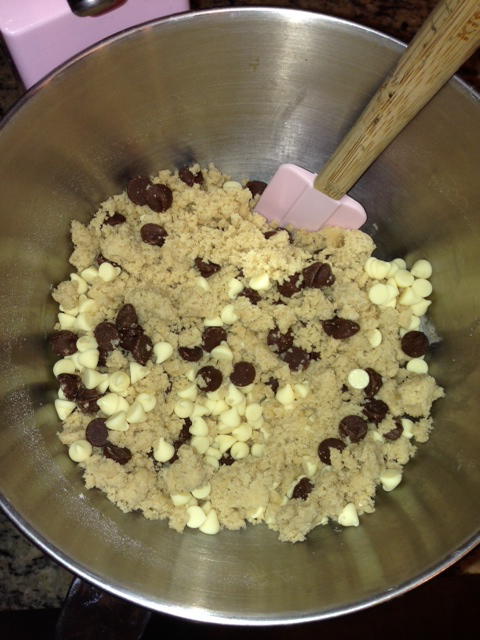
While searching for recipe inspiration, I tend to look for pictures. I feel that images give you a true understanding of the steps and final product and therefore give you the best idea of exactly what you’re baking and creating. Throughout my blog I found that it is the most beneficial to provide many pictures. These original pictures that I posted throughout the blog show individual step and processes of my experiences, allowing me to truly connect with my reader. Other tools that I felt were highly beneficial throughout my specific blog were both the video and slide show tool. The video was great as it allowed me to directly talk to my followers and allow them to feel like I am talking directly to them. The slide show tool allowed me to use many more photographs than I would originally be able to use as it condenses them to one place and doesn’t make my blog post so long that nobody finishes reading it.

Storify was a tool that I found least beneficial throughout the semester. I completely understand how it could be useful for topics, such as politics, where there may be a lot of back-story, information, and research used as it allows the reader to see that. However, baking is something that is very personal and therefore it was difficult to find enough information to fill my Storify page.

Technology is constantly changing and people’s views and opinions are always different and conflicting, but advertising is a field where the mass media must be pleased for it to be truly successful. Personally I love social media and the power that it has over people in today’s society. I feel that while social media is currently dominant, it will progress to being an even more dominant way to get advertisements out into the public eye.

This semester has challenged me to use various types of new technology, such as using film and recordings to convey a message. Although I personally don’t want to be in a field that involves me being in front of the camera, I feel that it would be a valuable for me to find comfort in it. Flexibility with advertising and journalism is a true asset and can only benefit me. I want to build a tech savvy brand for myself and this will involve me evolving as social media and technology evolves.

Below is a Chocolate Coconut Pie that I whipped up this past weekend. I was inspired by Martha Stewart to make this! It has a coconut macaroon base and is filled with fresh chocolate ganache! Check out the recipe at http://www.marinmamacooks.com/2012/12/chocolate-coconut-pie/. It is so simple and tastes too yummy not to try! It would be perfect for any Thanksgiving Feast!!

photo

 Thank you so much for visiting!

– Charlotte.

Noah’s First Birthday Baking Bonanza!

Hi Everyone!

November 8th was my nephews 1st birthday!

Here is the cutest little birthday boy ever!

10374434_10153308339422598_7826470282889604787_n

Way too precious!

We threw him the cutest bee themed first BeeDay party at my parents house in Fort Worth! This called for hours and hours of baking, mess making, and sugar consumption.

I have utilized Storify to show everyone a little sneak peek of all of the baking that took place this past weekend.

Check it out at https://storify.com/charlottelhowe/noah-s-first-birthday-baking#publicize

Hope that you enjoyed this even half as much as I did!

– Charlotte.

Oreo Balls.

Hi Everyone!

This week has been so incredibly busy and so when it came to this weeks bake, I knew that it had to be something quick and easy! In honor of National Chocolate Day yesterday (October 28th), I decided my bake absolutely had to include chocolate!

This weeks bake is some deliciously easy Oreo Balls. They are much easier than you would think and only require a few simple ingredients, a few minutes, and just a little mess. Now why would you not indulge when it is this easy??

Ingredients:

– 1 Pack – Oreos

– 8oz- Cream cheese (softened)

– White or milk chocolate (or both!)

Here is a how-to video about how to create the Oreo ball:

p.s. please forgive my awkwardness… I’m not an “on-screen” kind of person!

Quick method Recap:

– Mix finely grounded Oreos with softened cream cheese and mix into a smooth mixture.

– Divide and roll mix into small 1″ balls and refridgerate for 15 minutes.

Here is a how-to video about how to coat your Oreo Balls with a delicious layer of chocolate:

Quick Method Recap:

– Melt your chocolate.

– Dip your Oreo balls into the chocolate and remove with spoon.

– Place on parchment paper and refridgerate.

I am planning on making more of these for my nephews first birthday in a couple of weeks… but they’re going to be decorative and a little more fun and colorful for his birthday! Bakerella, one of my favorite baking blogs, has some great ideas for fun cake pop decorating ideas at http://www.bakerella.com/its-national-cake-pops-day/. Check them out! I just want them all, although I feel like I don’t have quite enough patience to make most of them.

Thanks for visiting!

– Charlotte.

Classic Apple Pie.

Hi everyone!

I am loving this slightly cooler weather… I know that it is not much cooler but I will take it!!

A couple of weeks or so ago I got to go to Fort Worth just  for a couple of days to visit my family. I absolutely love visiting them and wish that I could go a lot more often. What did we do?? Baking of course!! I take any opportunity that I get to bake in my mums kitchen. There is so much space.. Even with my 11 month old nephew hanging from my legs! haha

Anyway, back to baking… we made a classic apple pie! one of my absolute favorites.. seriously who doesn’t love apple pie??

Recipe:

Crust:

–  1 1/2 cup – All-purpose flour ( plus a little extra for dusting)

– 1 Stick (8 tbsp) – Cold butter

– 1 Pinch- Salt

– 1 Tspn – White sugar

– 5 tspn- Ice cold water

– 1 – Egg

Filling:

– 6 medium- Granny Smith Apples (Peeled and sliced)

– 1 Cup – Brown sugar

– 3/4 tspn – Cinnamon

– 3 tspn – Butter

(I doubled everything as I made two pies)

Here are the steps in pictures! I am a very visual learner so hopefully this might help you understand everything a little better!

This slideshow requires JavaScript.

 Method:

– Preheat oven to 450ºF.

– Place all sliced apples in a microwave safe bowl. Top with butter, cinnamon, and brown sugar. Microwave for 20 minutes, or until the apples are soft.

– In a food processor, add flour, cold butter, salt and white sugar. Mix until the ingredients are combined.

– Add enough water until it forms a ball. Cut the balls in half, wrap in plastic wrap and refrigerate for 30 minutes.

– flour your counter and roll out your dough until it forms an circle that is large enough to fill your pie tin. Place in your tin.

– Drain the extra liquid from the apples and fill the pie crust.

– Roll the additional pie crust out and create your desired design. Place on top of apples.

– Brush the top with egg wash and sprinkle with white sugar.

– Bake for 45 minutes and enjoy!!

Yes I made two because its too yummy to just make one!

Yesterday I was on one of my daily Pinterest binges and found this article at http://www.bhg.com/recipes/desserts/pies/pies-from-scratch/?socsrc=bhgpin111013leafpie&crlt.pid=camp.ffOayXW9awjx with so many incredible sounding pies! I think that I am going to have to try that maple-pear pie… immediately!

Thanks for visiting!

– Charlotte.

Rhubarb Turnovers.

Hi everyone!!

I can’t believe that we are already in October! It will be the holidays before we know it… although I am still waiting for the cold weather to finally be here! I have a feeling that I might be waiting a while. Well until then I guess that I can just bake fall goodies to try and convince myself that fall is finally here!

I am so excited to share this bake with you guys! This week I am going to be baking Rhubarb turnovers… now I know that technically rhubarb is not in season (which makes me very sad) but I feel like freshly baked warm pastry is a little more fall. Espcially when paired with a delicious hot caramel macchiato!

Growing up in England, I used to use a lot of rhubarb and gooseberries in my baking. Unfortunately both are almost impossible to find here, in fact I have never seen a gooseberry here… sad because they are so sweet and yummy! I got a little too excited when I managed to find frozen rhubarb at my local HEB… I may have bought 2 bags… or 3… maybe 4… I got a little carried away!

photo

Ingredients: 

1 pack – Sheet puff pastry

1 bag (approx. 2 cups/ 16 oz) – Frozen rhubarb (thawed and finely diced)

1/3 cup – White sugar

1/4 tspn – Ginger

1/2 cup – Butter

1 cup – Powdered sugar

Method:

– Gently mix together the thawed and finely diced rhubarb, ginger and sugar.

– Roll out your puff pastry sheet and cut into approximately 8 – 10 squares. Place these on a baking tray lined with parchment paper.

– Place a spoonful of your rhubarb mixture onto each square. Fold each square of pastry diagonally to create a triangle and firmly press the edges together using a fork.

photo

– Bake at 375º for about 20 minutes, or until golden brown.

– Just before they are ready make your glaze. Over low heat, melt your butter and then slowly add powdered sugar until you reach your desired consistency.

– Remove your turnovers and drizzle glaze immediately.

photo

I know that always say that baking makes me happy but I decided to see if it just me or if baking can actually affect someone mentally. I managed to come across this interesting article  at http://www.bbc.com/news/magazine-23756645 that proves that baking truly does make you happy. It shows that baking allows people to gain some sort of control and allows them to feel more at peace with themselves… I love that!!

– Enjoy!!

Thanks for visiting!

-Charlotte.

Yummy!

Hi everyone!

Sometimes I can get so annoyed when good recipes are hard to find and then when it comes to baking, the recipe  quantities are not in units that I like to use… It can take forever to convert all of the ingredients. This happened one too many times and I thought “hmmmmm what can I do to fix this issue?”. Then I thought of creating an app that helps to prevent these problems! Yummy! is an app that allows users to search and store recipes, add their own recipes, convert ingredient measurements, and post in chat rooms about any questions that they may have.

Introducing “YUMMY!”

Screen Shot 2014-10-01 at 10.54.02 AM

Screen Shot 2014-09-30 at 11.36.54 PM

Baking Conversion – All you have to do with this is select your ingredient, and then use the drop down boxes to select your original amount and unit and then it will convert it to the new selected unit! So much simpler than fumbling around trying to calculate the weight and continuously getting different answers.

Recipes – This lists many recipes which will be regularly updated. All the reader has to do is scroll and click on the name to see the full recipe. If they wish to save the recipe then they just click the star to the left of the name and it will add it to their personal “Recipe Box”. These saved recipes can be accessed by clicking the large star at the bottom. A user can also add their own recipes to their recipe box. This allows them to have a digitally stored version of a recipe and also makes sharing their recipes much easier.

Yummy! is the perfect app for bakers who don’t have an extensive recipe collection and just want to quickly find something delicious to make! It makes the whole process so easy and convenient!

An app that i am obsessed with is called “The Photo Cookbook”. Here is a sneak peak at http://www.thephotocookbook.com. It costs $3.99  but is worth every single penny! The entire app is just so visually pleasing and makes me so hungry every time that I open it!!

Thanks for visiting!

– Charlotte.

Delicious Butterscotch Blondies.

Welcome to Lottiecakes!

Fall is finally upon us, which is definitely my favorite baking season of the year! To me, it means gingerbread, butterscotch and of course pumpkin! This week I decided to make some  oh so delicious butterscotch blondes… my favorite variation of the tradition brownie!

The only thing we need now is a little cooler weather to go along with these blondies and I would be one very happy person!!

photo

Ingredients:

– 1/2 cup – softened butter
– 1/2 cup – white sugar
– 1/2 cup – brown sugar
– 1 – egg
– 1 tspn – pure vanilla extract
– 1/2 tsp – baking powder
– 1 cup – all purpose flour
– 1/2 cup – butterscotch chips

Method:
– Mix together the sugars and the softened butter until combined. Add the egg and vanilla and continue to mix.
– Combine the flour and baking powder until there is a cookie dough like consistency.
– Fold in the butterscotch chips… I always end up adding a few more!
– Line a 9×9 pan with parchment paper, spread the mixture evenly inside of it.

photo
– Bake for 30-35 minutes or until golden brown.
– Serve and enjoy!!

Here are a few of my other favorite blondie recipes that I have recently discovered! They sound so yummy that I just have to share them with everyone!

Do you love social media?? Follow me on Twitter!

Thanks for visiting!

– Charlotte.

Pretty Sugar Cookies.

Hello everyone!

Welcome back to Lottiecakes!

November is my nephews 1st birthday so of course my sister and I are getting a little carried away with the planning! We call him our little Honey Bee so he is having a “First BeeDay” Party! As we were planning, I started thinking about what we were going to do for party favors… so we decided on decorative sugar cookies! They are a perfect little sweet treat for all of our guests to take away with them! Although I may need a little practice!

It may be kind of surprising to know that I have actually never made sugar cookies.. even though it is just so simple. There is no better time to start than now! I didn’t want to start with anything too complicated so I decided upon a simple crinkle circle cookie with the toothpick drag method of icing!

photo

Ingredients:

Cookie:

– 3 1/2 cups – all purpose flour

– 1 1/4 – cup sugar

– 2 sticks – room temperature butter

– 1 – medium egg

– 1 1/2 tsp – baking powder

– 1 tsp – salt

– 1 tsp – pure vanilla extract.

Cookie frosting/ Glaze:

– 1 cup – powdered sugar

– 4 tspn – water

Method:

Cookie:

– Cream together the butter and sugar until it has a smooth, fluffy texture. Slowly add in the egg and vanilla extract until it is completely combined.

– In a separate bowl, mix together the flour, salt and baking powder.

– with the mixer on a medium speed, slowly add the dry ingredients to the wet ingredients. Continue to combine until the mixture is thick but spreadable and still moist. I usually still have about a half to a full cup of the dry mixture left over when I have achieved the correct consistency… and that is completely okay!

– Wrap the mixture in plastic wrap and refrigerate for approximately an hour, or until the dough is cold.

photo

– When the dough is cold, cut it in half (this makes it easier to handle) and roll it out on parchment paper until it is 1/4″ thick. Don’t roll it out on extra flour as this can affect the consistency!

– Cut into your desired shape and place on parchment paper on a baking tray.

photo

– Bake for 8-10 minutes, or until the bottom just begins to brown. Keep an eye on them as they can burn very quickly!

– Allow to cool before decorating.

photo

Cookie frosting/ Glaze:

– Slowly add water to the powdered sugar and whisk.

– You can always make it thicker by adding more powdered sugar and thinner by adding more water.

– Test it on a cookie to make sure that it covers but does not run… simple as that!

– You can divide the mixture and add food coloring if you want multiple colors of icing.

– Add the icing to a piping bag with a small tip. You can always use a sealed ziplock bag with a small hole cut in the corner if you don’t have piping bags!

– Pipe a circle around the edge of the cookie and then fill the inside. This creates a border so that you don’t loose your icing off the side of the cookie.

– To create my toothpick drag method, pipe on a few lines of a different colored icing across your white icing. Simply drag a toothpick through the icing, alternating the direction. Mine are a little messy but practice definitely makes perfect!

I managed to make about 18 cookies and only used half of the dough so this recipe definitely makes a lot. I love to make a dough or mixture in bulk and then just freeze it so that it is ready for a spontaneous bake session!

They are cute and delicious! They make  perfect snacks, gifts, treats… the options are endless!

I really like how foodandwine.com got creative with their sugars cookies at http://www.foodandwine.com/slideshows/christmas-cookie-gift-tags and used cookies as edible gift tags!! It is such a fun and yummy way to personalize a gift!

Thanks for visiting!

– Charlotte.

Fresh Strawberry Pie.

Hello Everyone!

This week I have been craving pie… no specific kind.. just pie!

It may have been due to the fact that I cannot stop watch The Great British Bake Off and it was pie week. Although theirs looked a little more professional than mine could ever look, I thought I would give it a go. I’m still drooling over their recipes and I love how easily available they make their recipes at http://www.bbc.co.uk/food/recipes/search?programmes[]=b013pqnm… especially the rhubarb and custard tart. YUM!!

As far as pie crust, I have found a great recipe originally created by The Country Cook called the Wham Bam Pie Crust at http://www.thecountrycook.net/2012/09/wham-bam-pie-crust.html. It has only 4 ingredients and the best part is that it requires absolutely not rolling or stretching like a tradition crust. It is perfect for a quick and easy pie base! 

Since I had figured out the crust, I still had to figure out exactly what I wanted to fill it with. As it was a ridiculously hot, I decided to opt for a cold, fresh strawberry pie. It uses only a few ingredient making it incredibly easy and yet still delicious!

photo

Ingredients:

Pie Crust:

– 1 3/4 Cup All-purpose Flour

– 1/2 Tsp. Salt

– 1/2 Cup Vegetable Oil

– 2 Tbsp. Water.

Strawberry Pie Filling:

– 1 1/2 Quarts of strawberries (6 cups)

– 1 Cup – White Sugar

– 3 Tbsp. Corn Starch

– 1/2 Cup – Water

Method:

Pie Crust:

– Mix together the salt and flour. Mix in the Oil and Water.

– Stir until it forms a soft dough.

– Spray your pie tin with non-stick cooking spray.

– Place the entire ball of dough in the middle of the pie tin and begin pushing it down. This will allow the dough to spread and eventually fill the entire tin. Feel free to crimp the edges.

– Bake at 400°F for around 15 minutes, or until golden brown.

photo

Pie Filling:

– In a saucepan, add the Sugar, Corn Starch, water, and 1 Cup of crushed strawberries.

– Place over heat and continuously stir until it begins to boil and thicken. Let it cool completely.

– Place your strawberries (whole or sliced) into the cool pie crust.

photo

– Gently pour the cooled strawberry mixture evenly over the strawberries.

– Allow to set completely in the fridge for at least 2 hours before serving.

It is best served with some freshly whipped cream!

Thanks for visiting!

– Charlotte.

Back to Basics – Chocolate Chip Cookies.

Hello Everyone!

No matter how many I eat, chocolate chip cookies never seem to get old. Of course I do love to add oats, cranberries, or even pumpkin but nothing seems to beat a classic chocolate chip cookie.

photo

They are a little indulgence that can be made by anyone with a little time to spare and a working oven, obviously.

photo 1

Ingredients:

– 1/2 Cup – Butter (Softened)

– 3/4 Cup – Brown Sugar

– 3/4 Cup – White Sugar

– 2 – Large Eggs

– 1 Tspn – Pure Vanilla Extract

– 12 Oz – Milk Chocolate Chips

– 12 Oz – White Chocolate Chips

– 2 1/4 Cups – All Purpose Flour

– 3/4 Tspn – Baking Soda

– 1 Tspn – Salt

photo 2 

Method:

– Set your oven to 375°F and line a couple of baking sheets with parchment paper.

– First mix together your softened butter, vanilla, eggs and sugar until it has a smooth consistency.

– Next mix together your flour, baking soda and salt in a separate bowl.

– Slowly combine the dry ingredients into the wet ingredients and mix well. Be careful not to over mix. When they are combined, add in your chocolate chips. 

– Using lightly damp hands, scoop and roll the dough into small balls. Place appromiately 1.5-2 inches apart on the baking tray.

– Place in the oven and bake for 12-16 minutes, or until golden brown. They should be a little gooey still when you remove them from the oven as they will harden a little as they cool. 

– Transfer hot cookies to a cooling rack to cool.

– Eat and enjoy!!


Its kind of funny how some people can just guess on their amounts of ingredients and get it perfect, whereas some people have to measure everything out perfectly (Thats me!).

 Well it turns out that there actually is a science to mastering the perfect cookie.

Here is an interesting article that i stumbled upon on time.com that investigats how little changes within the cookie recipe and preparation can result in completely different cookies outcomes!

http://time.com/3179770/the-science-behind-baking-the-most-delicious-cookie-ever/


Thanks for visiting!


– Charlotte.